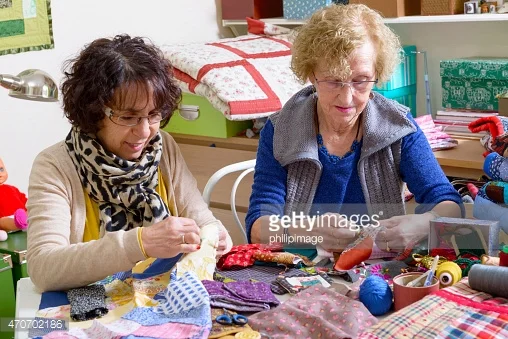
Workshops
Thank you for looking over my teaching information. If you like what you see and are considering engaging me as an instructor, I'd like to offer a few suggestions:
About Face, Pictorial Applique and Pieced Pictures are my favorite workshops to teach because I consider those my specialties. However, the other workshops offered are also fine workshops. Since About Face and Pictorial Applique have complicated subject matter I really do feel that 2 or more days of this class are needed to really get down the technique and get into the students' projects. In the 2 or more day format, students can design their own quilts, whereas a project is provided for the 1 day class so the student can work through the layering process.
Please review my general teaching information for pricing and other details. If you have any questions feel free to call or email. I am much more efficient when dealing with phone calls.
Workshops
Appliqué for Realism in Brief
6 hour class
Advanced technique but willing beginners are acceptable for class
A demonstration using photos to make patterns for realistic appliqué figures and class project featuring reverse layering. Elaborates on the techniques explained in my book, Faces & Places - Images in Appliqué, and it's sequel, Focus on Features - Life-like Portrayals in Appliqué. An intricate study in appliqué and reverse appliqué.
Student's supplies: Basic sewing kit, thread to match, small, fine scissors that cut all the way to the point, removable fabric markers, masking tape, tracing paper, if you have a light box and can bring it, please do so.
Fabrics: 1/4 yard each of 4 to 6 different gray fabrics (solids only!) ranging in value from dark to light and all of a similar hue. Include black and white in addition to grays, if desired. (NOTE: Another color besides gray may be chosen, but gray is safe. If opting for another color make sure to have 4 to 6 light to dark values of that color. Optional: ½ yd. pastel color (can be print) of your choice for background. Project will be Dancer's Head from Faces & Places book.
If requested, I can kit the fabrics (not including background) for this class for an additional fee of $7.00.
Teacher's supplies: Projector table, large screen, extension cords and power strips and, if you can provide some, light boxes. A rolling cart would be very helpful.
6 hour class - Advanced technique but willing beginners are acceptable for class.
Pictorial Applique
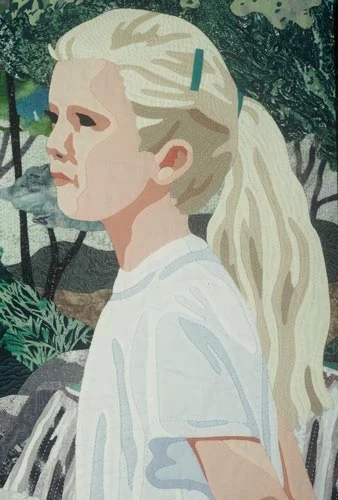
Detail of "Naiad," created using the techniques taught in the "Pictorial Applique" workshop.
3 to 5 day class
Advanced technique but willing beginners are acceptable for class
Starting from photos to we will make patterns for realistic appliqué figures and then work through the techniques needed to create them. Several small drawing and stitching exercises will help to understand how each process works. You may choose, animals, landscapes, flowers or, my favorite, portraits of people. The class elaborates on the techniques explained in my book, Faces & Places - Images in Appliqué and in its sequel, Focus on Features - Life-like Portrayals in Appliqué. (These books are out of print - if you have them you may want to bring them but they are not needed for the class.) It is an intricate and tricky study in appliqué and reverse appliqué, but mastery of the technique is well worth the extra effort.
Student's supplies: Kit fee: $4.00 - Basic sewing kit, thread to match, pins, small, fine scissors that cut all the way to the point, removable fabric markers, masking tape, fine black permanent marker, Fraycheck, write-on transparency film and tracing paper. If you have a light box and can bring it, please do so. Select photographs, clippings, etc. of something you would like to be the subject of your quilt - give yourself a wide choice and then narrow it to one or two you like best. Please allow Charlotte to prescreen your chosen photograph(s) for feasibility. Email photo* at least 2 weeks before class. After consulting with Charlotte enlarge your photograph to desired size before class. If you know how large you want the subject of your quilt, make a color copy of your photo and have it blown up to the size you wish to make it on your quilt (for instance, life-size for a portrait or face is recommended). It is OK to print from your computer on letter size paper and splice it together with tape to make a larger size.
If you haven't decided on a size, you can possibly arrange to enlarge during class but things will go smoother if you enlarge it ahead of time. Newsprint or sketch paper - as large as the quilt you will be designing in class, and tracing paper. Many of the above supplies will be available for purchase in class.
Fabrics: If you opt to do a provided class project (but I would really prefer that you design your own) bring: a fat eighth each of 4 to 6 different gray fabrics (solids or almost solid color fabrics only!) ranging from dark to light and all of a similar hue. Include black and white in addition to grays, if desired. Another color besides gray may be chosen, but gray is safe. If opting for another color make sure to have 4 to 6 light to dark values of that color. ½ yd. pastel color (can be print) of your choice for background. If you will be designing your own quilt bring lots of fabric appropriate to the size and subject matter of your project - i.e., several shades or values (4 to 6 each) of the colors for any figures, prints and textures where applicable.
*When emailing photos try to reduce the resolution of your photos so they don’t appear bigger than my monitor screen. Large resolution photos use up the band width on my server quickly.
Teacher's supplies: Projection screen, whiteboard or flipchart with markers, power strip and extension cord, a rolling cart would be very helpful.
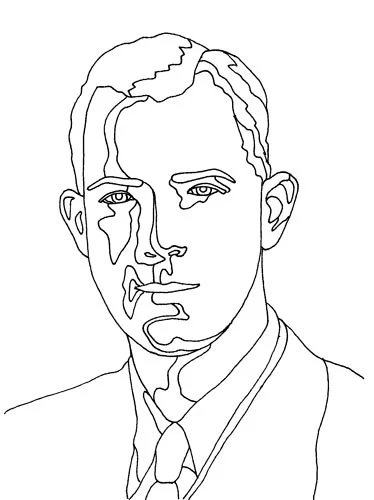
About Face – Applique Portraits
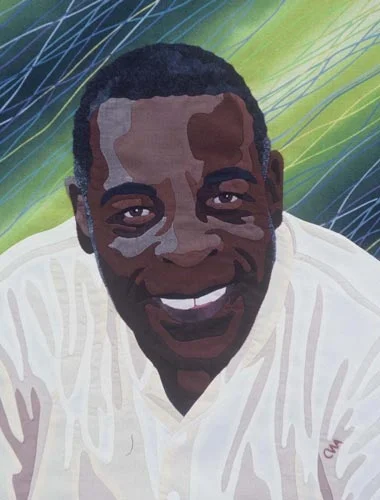
"Ernest," an example of a portrait made in the "About Face" workshop.
2 to 5 day class
Use a photo to make a pattern for a realistic portrait and then hand applique to create the face. Drawing and stitching exercises will help to understand how the process works. Bring one or more head shots of a person or animal. The class elaborates on the techniques explained in my book, Faces & Places - Images in Appliqué and in its sequel, Focus on Features - Life-like Portrayals in Appliqué. (These books are available by print-on-demand or e-book but are not necessary to take the class.) This study in reverse layering is involved, but mastery of the technique is well worth the extra effort.
Removable fabric markers, masking tape, Fraycheck, write-on transparency film. If you have a light box and can bring it, please do so. Select portrait photographs - give yourself a wide choice and then narrow it to one or two you like best. Please allow Charlotte to prescreen your chosen photograph(s) for feasibility. Email photo* at least 2 weeks before class. After consulting with Charlotte enlarge your photograph to approximate life-size – 8” – 10” from chin to top of head. It is OK to print from your computer on letter size paper and splice it together with tape to make a larger size.
Student supplies: Bring as many choices as you can of fabric appropriate to the size and subject matter of your project - i.e., several shades or values (at least 4 to 6 each going from light to dark) of the colors for any flesh, hair or fur, prints and textures can be used where applicable. Flesh toned fabric will be available for purchase in class but bring what you can find as well.
*When emailing photos try to reduce the resolution of your photos so they don’t appear bigger than my monitor screen. Large resolution photos use up the bandwidth on my server quickly.
Teacher's supplies: Projector table, large screen, extension cords and power strips and, if you can provide some, light boxes. A rolling cart would be very helpful.
Note: The difference between the previous 2 workshops is that one is focused particularly on portraits. In the other workshop landscapes, flowers, buildings, etc. will be accepted.
Portrait by Machine Workshop
"Carleen," an example of the quilt made in the "Portrait by Machine" workshop.
6 hour class
Intermediate to Advanced
Geared for those who don't like hand appliqué, this class project demonstrates how a face can be constructed with a reverse layering technique and without the build-up of stack-upon-stack of fusible products. Edges are finished with satin-stitch and resulting product is light and flexible.
Student's supplies: Kit fee: 15.00 (for fabric and patterns), small, fine scissors that cut all the way to the point, removable fabric markers, masking tape, seam ripper, light box (can be shared with another student), extension cord, sewing machine with regular, quilting and/or embroidery foot, fusible thread*, 4 to 6 different colors flesh tone cotton machine embroidery thread (optional)*, bobbin thread (optional)*, 10" x 12" piece Sulky Totally Stable stabilizer*.
Teacher's supplies: Projector table, large screen, extension cords and power strips and, if you can provide some, light boxes. A rolling cart would be very helpful. We’ll need as many irons as can be set up - 2 up to max of 4 to an iron - if this is the case should iron and ironing pad be included on supply list?
*These items available for purchase from teacher in classroom.
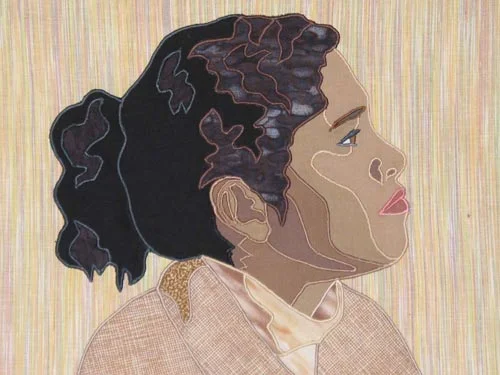
Portrait Pattern Drawing Workshop
"Noel," an example of the pattern made in the "Portrait Pattern Drawing" workshop.
4 hour workshop
For informed beginner and up
(My fee will be $475 for this workshop)
Study the process of using photos to create patterns for appliqué with an emphasis on faces. Pets and flowers are also welcome subject matter. Photos will be traced so extensive artistic ability is not required. No sewing will be done on this class.
Student's supplies: Kit fee: $3.00, ultrafine Sharpie (fine tip black permanent marker), write-on transparency film (available in class for purchase), 8 to 12 large photos at least 8" x 10" in size from your personal collection. Color copies are fine to use. Photos should not be in frames or be on thick (other than regular photo paper) paper. Snapshots may be used if they have been blown up to larger size on a color copier or computer. Close-ups are best - faces should be at least 5" - 6" from forehead to chin. Good shadowing and contrast are desirable in your photos. Sharp pencils, eraser, tracing paper. If you have a light box and can bring it along with an extension cord please do so.
Teacher's supplies: Overhead projector with screen or Projector table, large screen, extension cords and power strips and, if you can provide some, light boxes. A rolling cart would be very helpful.
Portrait Pattern Drawing Watch and Learn
2-hour workshop
For informed beginner and up
(My fee will be $300 for this workshop)
Study the process of using photos to create patterns for appliqué with an emphasis on faces in this seminar showing how Charlotte implements line drawings. Pets and flowers are also part of the subject matter. No sewing will be done in this class but be prepared to take notes.
Student's supplies: Kit fee: $1.00 , Paper & pencil
Teacher's supplies: Overhead projector with screen or white wall or Projector table, large screen, extension cords and power strips and, if you can provide some, light boxes. A rolling cart would be very helpful.
Layered Landscapes Workshop
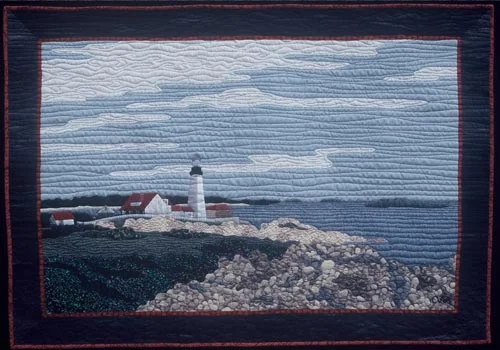
"Cape Elizabeth," a finished quilt started in the "Layered Landscapes" workshop.
1 to 3 day workshop
For intermediate and up skill level
Select your favorite landscape photo for class and turn it into an appliqué design. Then working from the pattern you have created, learn to layer the landscape so no backing muslin is needed. Fabric and color choices will also be discussed in order to achieve desired reality. Techniques from the landscape portion of my book, Faces & Places - Images in Appliqué.
Student's supplies: Basic sewing kit, needles (I like 11 or 12 sharps), thread to match fabrics, pins, scissors (small, fine ones that cut all the way to the point), pencil, removable fabric markers, notebook, masking tape, 4 letter size sheets of write-on transparency film (available in class for 25 cents a sheet), black permanent fine-tip marker, tracing paper, 18" x 24" drawing paper, fabrics in amounts, colors and textures appropriate for portraying your landscape - give yourself as wide a selection as you can. If you have a light box and can bring it, please do so; one is not required for every person. Email your chosen photos* (not more than 3 please) at least 2 weeks before class. After consulting with Charlotte enlarge your photograph to approximately 18” x 24” before class. It is OK to print from your computer on letter size paper and splice it together with tape to make a larger size. Don’t spend a lot of money on this enlargement.
For two or more day class you may choose to make a larger project. Bring paper large enough and enough transparency film for the project you have in mind and fabrics in the amounts, colors and textures appropriate for portraying your landscape in a larger size. *When emailing photos try to reduce the resolution of your photos so they don’t appear bigger than my monitor screen. Large resolution photos use up the band width on my server quickly.
Teacher's supplies: Projector table, large screen, extension cords and power strips and, if you can provide some, light boxes. A rolling cart would be very helpful. Light boxes - as many as possible - or room with accessible windows is an acceptable alternative.
Note: Layered Landscapes is included the Pictorial Applique workshop as long as the class is three days or longer. Students are allowed more options in the longer format class this way. Do not book both workshops unless there will be different students in each class. Please ask if you have any questions about this.
Pieced Pictures Workshop
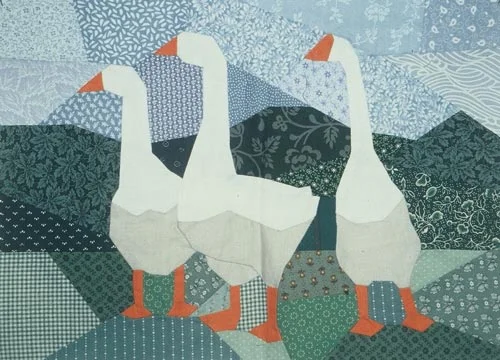
"Geese," created in the "Pieced Pictures" workshop.
1 to 4 day workshop
For intermediate and up skill level
Translate pictures, line drawings, photographs, into piecework—a technique that gives a slightly more abstract look to the subject. Make patchwork of animals landscapes, buildings, anything you choose. You may opt to get intricate enough that you friends will think you have appliquéd instead of pieced. This is a different approach to pieced pictures than you may have learned elsewhere and is applicable to pictures ranging from block size to a full size quilt.
Student's supplies: Handouts - $1.00, basic sewing kit, needles, pins, scissors (both paper and fabric), X-acto or craft knife and small cutting mat (optional), ruler, pencils, fabric markers, notebook, masking tape, tracing paper, sandpaper board (or piece of fine sandpaper glued inside manila folder), small envelopes.
Fabrics: A wide variety of small amounts (scraps or 1/4 yds.) of fabric in scenic colors—at least 6 each of light blues, light greens, dark greens, tans. Several browns, blacks, grays in prints or solids, small amount of white and orange, thread to match or can sew with neutral color. Students are encouraged to share with other students, if willing. Optional: freezer paper and iron, sewing machine with accessories.
For 2 or more day class add: Large paper in size according to the project you have in mind (graph paper can be helpful), several photos, drawings, magazine clippings, etc. of a landscape, animal, building, or whatever you would like to make into a pieced picture. Fabrics in colors, prints, textures and amounts appropriate to your subject matter. Please allow Charlotte to prescreen your chosen photograph(s) for feasibility. Email photo* at least 2 weeks before class. After consulting with Charlotte enlarge your photograph to your preferred size. It is OK to print from your computer on letter size paper and splice it together with tape to make a larger size.
*When emailing photos try to reduce the resolution of your photos so they don’t appear bigger than my monitor screen. Large resolution photos use up the band width on my server quickly.
Teacher's supplies: Projector table, large screen, extension cords and power strips, 2 irons and ironing boards. A rolling cart would be very helpful.
If I Were a Carpenter - but I'm a Quilter (Workshop)
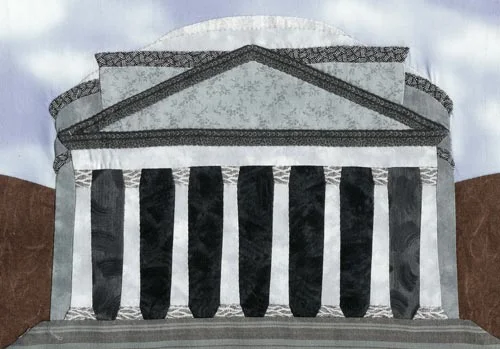
"Pantheon," created in the "If I Were a Carpenter" workshop.
1 to 2 day workshop
For intermediate and up skill level
A class on putting architecture into pictorial quilts. You may desire do to a rendering of your own home, a city landmark, or a world recognized structure. Topics will cover how to go about designing a pattern (as simple or complex as you like), fabric suggestions, and deciding whether to construct the quilt in piecework or applique.
Student's supplies: Basic sewing kit, scissors (both paper and fabric), pencil eraser, ruler, masking tape, newsprint or better paper as large as you plan to make your quilt, freezer paper, scotch tape, several sheets of write-on transparency film (available in class at 50 cents a sheet), black fine-tip permanent marker. Select several photos of building(s) you would like to interpret in fabric and narrow them down to 3. Please allow Charlotte to prescreen your chosen photograph(s) for feasibility. Email photo* at least 2 weeks before class. After consulting with Charlotte enlarge your photograph to your preferred size. It is OK to print from your computer on letter size paper and splice it together with tape to make a larger size.
Fabric suitable for portraying your chosen building in appropriate prints, stripes, solids - in amounts adequate to complete the size of quilt you have in mind whether single block or large quilt.
*When emailing photos try to reduce the resolution of your photos so they don’t appear bigger than my monitor screen. Large resolution photos use up the band width on my server quickly.
Teacher's supplies: Projector table, large screen, extension cords and power strips, 2 irons and ironing boards. A rolling cart would be very helpful.
Whirly Twirly Quilting Designs Workshop
3 hour workshop
For all skill levels
A technique to make flowing quilt designs that resemble patterns made with a Spirograph toy. This method will enable you to make a quilting design of any size. Use designs to enhance pieced compasses, other traditional blocks, or whole cloth quilts.
Student's supplies: Handouts - $1.00, scissors (paper), ruler, sharp pencils, pencil sharpener (or mechanical pencil), eraser, template material, scotch tape, pad of plain paper (8 ½" x 11" or larger), compass, protractor, any French curves or other drafting implements you may own or wish to buy (cheap ones from K-Mart!), a flexible curve is also handy.
Teacher's supplies: Projector table, large screen, extension cord and power strip. A rolling cart would be very helpful.
Machine Quilt Geometric Designs without Marking Workshop – ½ day
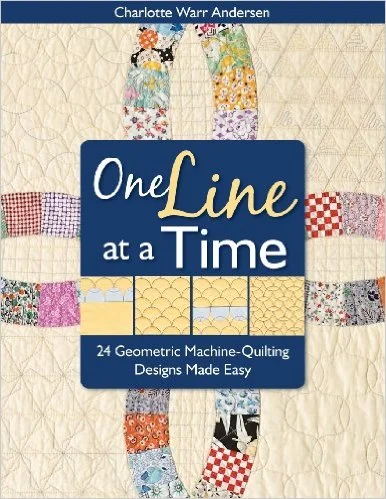
This workshop teaches techniques found in my book One Line at a Time.
3 hour workshop
For informed beginner and up skill level
This workshop involves designs, many of them of sashiko origin, which I developed on a silk quilt that I did not want to launder – therefore marking the quilt was undesirable. Using tools and techniques practice 4 - 5 quilting patterns from my book, One Line at a Time.
Supplies: Kit fee - $3.00, five – 10.5” square quilt sandwiches prepared for quilting (solid color fabric for top and back, white recommended, with light weight cotton or wool batting, may be hand basted in 4” grid or spray basted). Sewing machine with any extending/adjustable seam guides and walking foot, if possible, darning or free-motion quilting foot, contrasting machine quilting thread – full spool, fabric scissors, paper scissors,18” ruler with line for 60° angle, 1” wide blue painter’s masking tape, pins, seam ripper or blunt tapestry needle, notebook, pencil.
Teacher’s Supplies: Projection screen, chalk, chalkboard and eraser, or whiteboard or flipchart, power strip and extension cord, a rolling cart would be very helpful.
Machine Quilt Geometric Designs Without Marking Workshop

Full day workshop
This workshop involves designs, many of them of sashiko origin, which I developed on a silk quilt that I did not want to launder – therefore marking the quilt was undesirable. Using tools and techniques practice 6 quilting patterns from my books, One Line at a Time and One Line at a Time Encore plus two patterns not included in the books.
Student Supplies: Kit fee - $4.00, Eight 10.5” x 10.5” quilt sandwiches prepared for quilting (solid color fabric for top and back, white recommended, with light weight cotton or wool batting, may be hand basted in 4” grid or spray basted). Sewing machine with any extending/adjustable seam guides and walking foot, if possible, darning or free-motion quilting foot. Contrasting machine quilting thread – full spool, 12” or 18” ruler with line for 60° angle, 1” wide blue painter’s masking tape.
Teacher's supplies: Projection screen, chalk, chalkboard and eraser, or whiteboard or flipchart, power strip and extension cord, a rolling cart would be very helpful.
An Eye for Faces Workshop
1 to 4 day workshop
For intermediate and up skill level
3-hour workshop
For intermediate skill level
Using reverse appliqué, construct a detailed eye complete with eyebrow, lashes, iris, eye white, pupil and tear duct - tiny details you would think are impossible to do in appliqué, but are actually quite easy done with the proper technique. If time, a demonstration of drawing a pattern for a face will take place.
Student's supplies: Basic sewing kit, pins, needles, scissors (small, fine ones that cut all the way to the point), thread to match fabrics, removable fabric markers, pencil, notebook. If you have a light box and can bring it to class please do so.
Fabrics: 6" square flesh color, 3" squares of your choice of color for eyebrow, lashes, iris, and white, black and pink.
Teacher's supplies: Projection screen, chalk, chalkboard and eraser, or whiteboard or flipchart, power strip and extension cord, a rolling cart would be very helpful.
Up or Down? Workshop
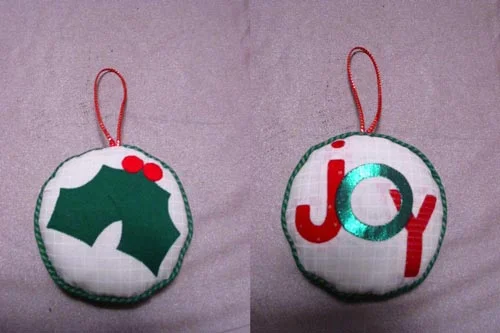
Christmas ornament made in the "Up or Down?" wokrshop.
3 hour workshop
For informed beginner and up skill level
So you don't know the difference between appliqué and reverse appliqué or when it's appropriate to use one technique over the other? Then this is the class for you. Make a Christmas ornament that will give you experience in both processes.
Student's supplies: Basic sewing kit, scissors (small, fine ones that cut all the way to the point), thimble, a light box if it is convenient for you to bring one. Kit fee $5.00
Teacher's supplies: Projector table, large screen, extension cord and power strip, a rolling cart would be very helpful.
Fusible Thread Appliqué Workshop

"Bluebird," made in the "Fusible Thread Applique" workshop.
3 hour workshop
For informed beginner and up skill level
A lightweight approach to fusible appliqué. Fusible thread (several brands available) is used in the bobbin and can be used to create appliqué forms that avoid the build-up and stiffness of other fusible products. This method is suitable for quilts or clothing. Class project is a bluebird on a branch.
Student's supplies: Kit fee $14.00, sewing machine & extension cord, basic sewing kit, scissors (small, fine ones that cut all the way to the point), fabric markers, invisible thread, a light box if it is possible for you to bring one.
Teacher's supplies: Projector table, large screen, extension cords and power strips and, if you can provide some, light boxes. We’ll need as many irons as can be set up - 2 up to max of 4 to an iron ( if this is the case should iron and ironing pad be included on supply list?) flannel board or foam core board. A rolling cart would be very helpful.
An Eye for Faces Workshop
3 hour workshop
For intermediate skill level
Using reverse appliqué, construct a detailed eye complete with eyebrow, lashes, iris, eye white, pupil and tear duct - tiny details you would think are impossible to do in appliqué, but are actually quite easy done with the proper technique. If time, a demonstration of drawing a pattern for a face will take place.
Student's supplies: Basic sewing kit, pins, needles, scissors (small, fine ones that cut all the way to the point), thread to match fabrics, removable fabric markers, pencil, notebook. If you have a light box and can bring it to class please do so.
Fabrics: 6" square flesh color, 3" squares of your choice of color for eyebrow, lashes, iris, and white, black and pink.
If requested, I can kit the fabrics for this class for an additional fee of $4.00.
Teacher's supplies: Projector table, large screen, extension cord and power strip, a rolling cart would be very helpful.
Note: Techniques taught in this class are demonstrated in the About Face and Pictorial Applique Classes.
Free-Formed Flowers Workshop
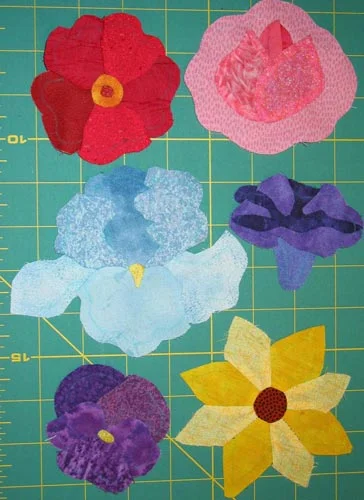
Flowers made in the "Free-Formed Flowers" workshop.
3 hour workshop
For all skill levels
Construct multi-hued flowers, such as those for Baltimore appliqué, petal by petal separately from the background. Completed flowers are then sewn in place - a process that will give your quilt an even hand with no built-up layers and easy quiltability.
Student's supplies: Basic sewing kit, needles, pins, small, fine scissors that cut all the way to the point, thread to match fabrics, removable fabric markers, if you have a light box and can bring it, please do so.
Fabrics: 6" squares (or scraps) of 5 shades or values of flower color of your choice (i.e. pink, blue, yellow - solids are easiest to work with), 2 shades of green, 8" square of background fabric.
Teacher's supplies: Projector table, large screen, extension cord and power strip, light boxes (if available), or room with lots of accessible windows to use as light boxes. A rolling cart would be very helpful.
If requested, I can kit the fabrics for this class for an additional fee of $5.00.
Sheer Effects Landscape
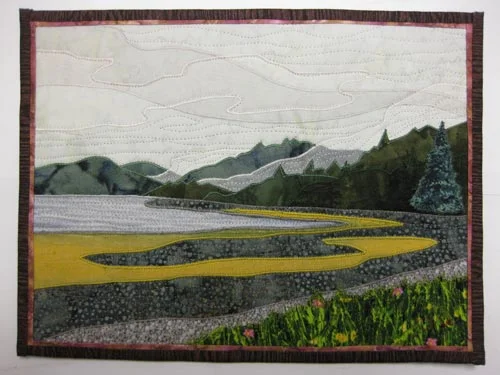
"Juneau," created in the "Sheer Effects Landscapes" workshop.
Create subtle illusions in a landscape by using sheer fabrics and fusible thread. The 8” x 10” scenic vista demonstrates how to make the most of fabric choices. This fabric collage will be suitable for quilting or simply mat and frame it.
Kit - $15.00 Includes all materials needed.
Removable fabric markers, masking tape sewing machine & extension cord. If you have a light box and can bring it, please do so.
Funky Fusible Fish
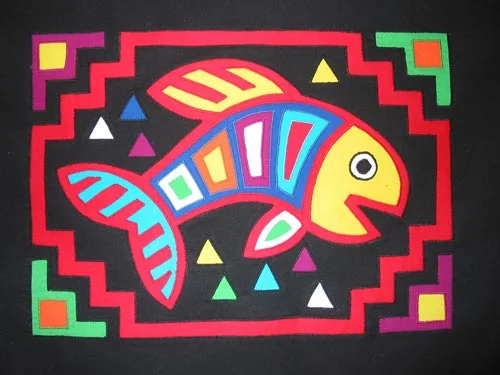
"Funky Fish" from the "Funky Fusible Fish" workshop.
Create a vibrant fantasy fish with a fun and easy exercise in reverse appliqué. This technique imitates the look of a mola but, unlike the noted Kuna Indian folkart of the San Blas Islands, there is no hand stitching or bulk from many layers of fabric. The secret is fusible thread.
Kit fee: $18.00 includes pattern fabric and fusible thread
Student Supplies: Pins, ball-point pen, small, fine scissors that cut all the way to the point, fabric markers suitable for marking black fabric, polyester invisible thread, black cotton machine embroidery thread, sewing machine & extension cord and a light box if you are able to bring one with you.
Teacher's supplies: Projector table, large screen, extension cords and power strips and, if you can provide some, light boxes. We’ll need as many irons as can be set up - 2 up to max of 4 to an iron ( if this is the case should iron and ironing pad be included on supply list?)
Fusible Thread Stained Glass
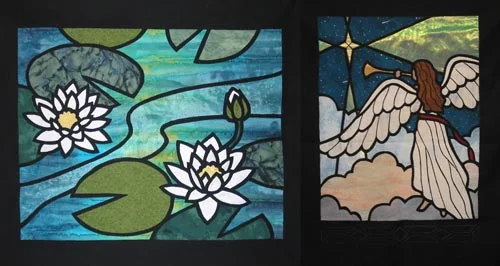
"Water Lilies" and "The Herald," projects for the "Fusible Thread Stained Glass" workshop.
This distinctive reverse appliqué technique uses fusible thread to create either “The Herald” (16” x 20”) or “Water Lilies” (20” x 16”), choices of projects for this class. The wall hangings utilize some sheer and satin fabrics, easy to use with this process.
Student’s Supplies: Pins, ball-point pen, sewing machine &extension cord, scissors (small, fine ones that cut all the way to the point), fabric markers, dressmaker’s tracing paper, black invisible thread, black machine embroidery thread and a light box, if you can bring one.
Teacher's supplies: Projector table, large screen, extension cords and power strips and, if you can provide some, light boxes. We’ll need as many irons as can be set up - 2 up to max of 4 to an iron ( if this is the case should iron and ironing pad be included on supply list?) A rolling cart would be very helpful.